Choosing Selective Pallet Racking is not just a matter of fitting more pallets into a building. It is a decision about load safety, picking speed, and how easily the layout can adapt when inventory changes. The 2024 MHI Annual Industry Report found that 55% of surveyed supply-chain professionals planned to increase technology investment. That figure does not measure rack demand, but it signals a market focused on operational improvement. A rack layout should support that goal, not obstruct it.
Start with the details visible on the warehouse floor: pallet dimensions, loaded weight, forklift turning radius, and clear height beneath sprinklers and lights. Measure the narrow aisle where operators reverse, not only the broad aisle on the drawing. Small differences matter. A pallet that overhangs its beam can affect capacity and safe handling. The Rack Manufacturers Institute’s ANSI MH16.1 standard provides engineering requirements for industrial steel storage racks; confirm that proposed systems are designed and installed for the actual loads and site conditions.
As a practical design principle, warehouse consultant and author Dave Piasecki emphasizes matching material-handling systems to the operation they must serve. Treat that as a prompt to verify assumptions, not as a substitute for a site-specific engineering review. Selective Pallet Racking can offer direct access to each pallet, but that flexibility has trade-offs in storage density and aisle space. There is no perfect layout. Before choosing, compare a typical busy shift with a peak-season one, then review the plan with a qualified rack designer and your equipment supplier.
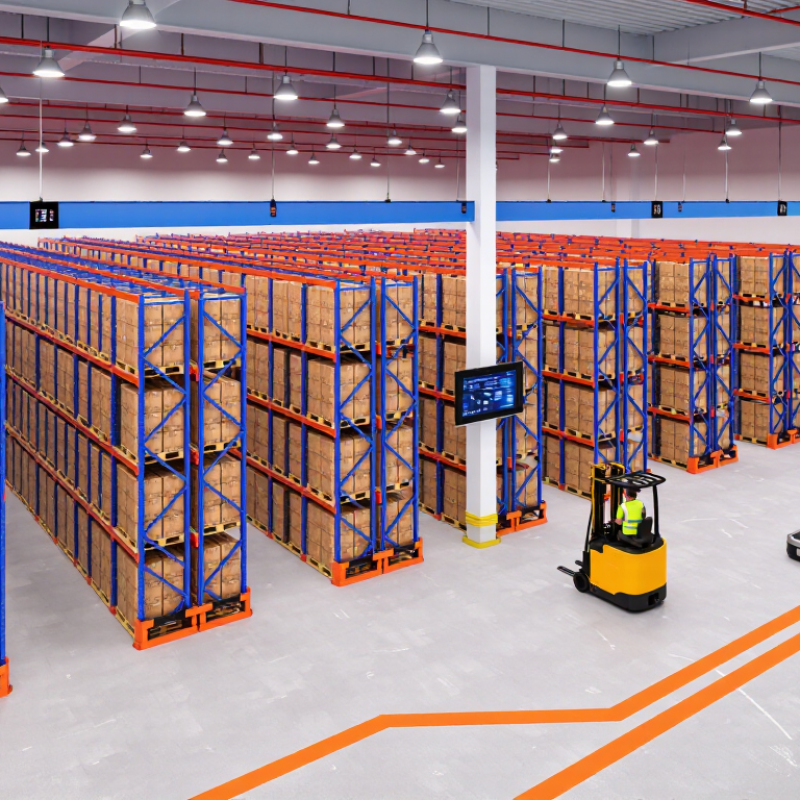
Assessing inventory and storage requirements should guide every racking decision. Start with accurate pallet measurements, including height, width, depth, and loaded weight. Record the number of pallets per SKU and their daily movement. Fast-moving products may need positions near dispatch areas. Slow-moving stock can occupy higher or less accessible levels.
Warehouse height matters, but it is not the only factor. Measure beams, lighting, sprinklers, doors, and forklift clearance carefully. A taller rack may increase capacity, yet it can create handling problems. Leave enough aisle width for the equipment used during busy shifts. Also check floor conditions and the building’s approved load limits. Local safety requirements should influence the final layout.
In practical warehouse projects, I have seen inventory records differ from actual pallet conditions. That estimate may be wrong. Walk the storage area and measure several loaded pallets yourself. Review seasonal peaks, damaged packaging, and future product changes. Selective racking works well when direct pallet access is important, but its capacity depends on disciplined slotting. Keep heavier loads on lower levels where possible. Label every location clearly. Recheck the design after a trial installation, because real forklift movement often reveals wasted space or unsafe turns.
How to Choose Selective Pallet Racking for Your Warehouse?
Measure Warehouse Space and Material-Handling Clearances
Start with a scaled floor plan, not a rough estimate. Record the building’s clear height, column positions, doors, sprinkler lines, and any uneven floors. Then measure each pallet load, including overhang, and note the widest load your team actually handles. A rack layout that fits empty pallets may fail when cartons extend beyond them. Small details matter.
Measure aisle width using the loaded truck’s turning path, not its advertised width alone. Include the pallet’s full depth and leave room for careful placement. OSHA reports that powered industrial trucks are involved in about 85 fatal workplace accidents each year in the United States. That figure does not make aisle width the only safety factor, but it shows why rushed clearances deserve attention. Confirm proposed dimensions against the truck manufacturer’s specifications and applicable rack-design guidance, such as ANSI MH16.1.
Mark the layout on the floor with tape before ordering. Test turns at intersections and check whether operators can see around end frames. Keep space for pedestrians, staging, and maintenance access; these areas often disappear on paper. One measurement may still be wrong. Recheck it with the actual load and truck, then have a qualified rack designer verify beam levels, capacities, and clearances.
Selective pallet racking works best when its dimensions match the pallet, load, and handling equipment—not just the available floor area. Measure the largest loaded pallet, including overhang, then allow clearance for safe placement and retrieval. A common North American pallet measures 48 by 40 inches, but actual loads can extend beyond its edges. Record load height and weight, too. The Rack Manufacturers Institute’s ANSI MH16.1 standard addresses structural design and load capacity; use qualified engineering advice to verify rack specifications for your site.
Pallet access changes the layout. Selective racks give forklifts direct access to each pallet position, which supports varied stock and frequent picking. Aisle width depends on the forklift’s turning and load-handling requirements, so confirm these with the equipment supplier before fixing rack rows.
MHI’s 2024 Annual Industry Report found that 55% of surveyed supply-chain professionals planned to increase technology investment. That figure does not prescribe a rack layout, but it signals why future handling changes deserve consideration.
I have seen layouts look efficient on paper, then feel cramped once turning space is tested.
Tips: Mark rack rows and turning paths on the floor before installation. Check beam levels, clearances, and the heaviest load with a competent rack designer. Leave room for change; it may cost a little space today.
Selective pallet racking should be sized for the loads it will actually carry, not just the average pallet. Confirm the weight of each unit load, including the pallet, packaging, and any uneven distribution. Check both beam capacity and the permitted load per bay. Keep a clear record of these figures. Small differences matter.
Ask a qualified racking professional to verify the layout and its stated capacities. Compare the proposed design with applicable local safety requirements and the rack manufacturer’s installation guidance. Post load notices where operators can see them, and train staff to report bent uprights, loose anchors, or damaged beams promptly. A rack can look fine from the aisle. Damage may be less obvious behind a pallet.
Site conditions can change what works. Measure clear heights, aisle widths, doorways, sprinkler clearance, and forklift turning space before ordering. Check the floor slab’s condition and capacity, and consider seismic activity where relevant. Allow room for guards and safe pedestrian routes. A neat drawing can still miss a low pipe or an uneven floor. Recheck measurements on site; it may feel repetitive, but a few centimeters can affect installation and daily handling. The best layout balances storage density with safe access, realistic operating patterns, and the limits of the building.
Example required beam load for two pallet positions per beam level
How to read this: Required beam load is calculated as the number of pallet positions multiplied by the maximum loaded pallet weight. These figures are examples, not rack ratings. Confirm beam and frame capacities with the rack supplier or a qualified engineer, and check the floor slab, anchors, clearances, handling equipment, and applicable local safety standards before installation.
Installation planning starts with the loads, not the aisle map. Record pallet dimensions, maximum weights, beam levels, and the heaviest expected load. Check the slab, floor level, ceiling height, sprinklers, and forklift turning space. Measure twice. Have a qualified installer confirm anchor locations, frame alignment, and clearances before work begins. A drawing may look spacious; a loaded forklift can prove otherwise. Keep the rack’s rated-load information available and visible.
Set a routine for visual inspections, with checks suited to traffic levels and applicable guidance. Look for bent uprights, displaced beams, missing locking pins, loose anchors, and signs of impact. Small details matter. Train operators to report damage promptly, and give a named person responsibility for follow-up. Inspection records should note locations, dates, findings, and repairs. A quick glance from the aisle is useful, but it cannot replace a closer check.
When damage appears, keep people and equipment away from the affected area, unload it only when safe, and seek assessment from a competent rack professional. Do not straighten or weld damaged components as a quick fix; hidden deformation can remain. Replace parts with compatible components approved for the system. Recheck anchors and connections after repairs, and review the cause of each impact. Sometimes the rack is blamed when a tight turning path is the real problem. That deserves a second look.
| Phase | Planning Dimension | What to Assess or Do | Practical Check or Record | Timing / Owner |
|---|---|---|---|---|
| Selection | Inventory and pallet profile | Record pallet dimensions, loaded height, weight, overhang, load stability, and the range of pallet types. Include the heaviest intended unit load. | Use measured load data rather than nominal product weights; identify unusual or non-standard loads for design review. | Before layout and rack specification; warehouse planner |
| Selection | Storage capacity and selectivity | Estimate the number of pallet positions required and how often each SKU must be accessed. Selective racking provides direct access to each stored pallet but generally uses more aisle space than denser systems. | Compare pallet positions, SKU access needs, replenishment activity, and usable floor area across layout options. | During concept design; operations and inventory teams |
| Selection | Forklift and aisle compatibility | Confirm the truck type, turning envelope, lift height, load handling method, and required operating aisle. Account for pedestrian routes and turning areas. | Verify clearances using the equipment specifications and an operational layout review; do not set aisle width from pallet dimensions alone. | Before final layout; warehouse planner and material-handling team |
| Selection | Rack configuration and load ratings | Specify bay width, beam levels, frame depth, beam elevations, and intended load arrangement. Ensure the rack design reflects actual unit loads and operating conditions. | Obtain design documentation and clearly displayed load information for the installed configuration. Never exceed stated beam or bay capacities. | Before purchase and approval; qualified rack designer or supplier |
| Selection | Building and site conditions | Check clear height, doors, columns, sprinklers, lighting, exits, utilities, floor condition, and slab suitability for the proposed rack and anchors. | Coordinate the layout with building plans and have floor capacity, anchor requirements, and applicable permits reviewed by qualified professionals. | Before installation; facilities team and design professionals |
| Selection | Safety and protection features | Assess frame guards, end-of-aisle protection, column protection, pallet supports, row spacers, and measures to prevent loads from falling into work areas. | Choose protection based on traffic patterns, load geometry, rack design, and local requirements; guards should not obstruct inspections or safe access. | During design review; safety and operations teams |
| Installation | Site preparation and layout marking | Clear the work zone, confirm the approved drawings, mark rack lines and aisle boundaries, and identify nearby services and emergency routes. | Check dimensions and clearances against the approved plan before drilling, anchoring, or erecting frames. | Before and during installation; installation lead |
| Installation | Assembly, anchoring, and alignment | Assemble components according to the design and installation instructions. Install specified anchors and confirm frame plumb, row alignment, and beam engagement. | Use the specified components and installation procedures; document checks and resolve deviations before loading. | During installation; trained installers and site representative |
| Installation | Handover and load communication | Complete a handover inspection, provide rack drawings and capacity information, and brief operators on safe loading, damage reporting, and prohibited modifications. | Display legible load notices for the installed arrangement and keep records accessible to supervisors and inspection personnel. | Before first use; installer, supervisor, and safety team |
| Operation | Loading and pallet placement | Place pallets evenly on beams or approved supports, keep loads stable and within the designated position, and follow the specified load limits and loading pattern. | Do not climb on racks, alter components, or use damaged pallets. Report unstable loads and prevent access to affected areas until made safe. | Every shift; forklift operators and supervisors |
| Inspection | Routine visual checks | Look for impact damage, bent or displaced members, missing locking devices, loose or missing anchors, leaning frames, damaged pallets, and falling-object hazards. | Provide a clear reporting route and promptly restrict access where a condition could create an immediate risk. | At a site-defined routine frequency and after notable impacts; trained employees |
| Inspection | Documented competent-person inspection | Arrange a systematic inspection by a competent person familiar with the rack system, its design information, and the site’s operating conditions. | Record inspection date, locations checked, findings, risk controls, corrective actions, and close-out evidence. Set frequency according to risk, use, and applicable rules. | At planned intervals and after significant changes or incidents; designated competent person |
| Maintenance | Damage response and repairs | Isolate affected bays or areas when damage may affect stability. Arrange assessment and repair using approved replacement parts and a suitable repair method. | Do not straighten, weld, drill, or modify structural members unless the repair is specifically assessed and authorized by a qualified professional. | As soon as damage is reported; supervisor and qualified rack professional |
| Maintenance | Housekeeping and access | Keep aisles, exits, fire equipment, and inspection access clear. Remove debris and correct floor or lighting issues that could contribute to collisions or unsafe handling. | Include aisle condition and visibility in routine workplace checks; maintain pedestrian and vehicle routes as planned. | Ongoing; operations and facilities teams |
| Change Control | Layout or load changes | Review proposed changes to beam levels, bay configuration, load dimensions, equipment, or storage use before implementation. | Obtain design review where the change could affect capacity or stability; update drawings, load notices, training, and inspection records. | Before any change; warehouse manager and qualified designer |
Important: Rack capacity, anchoring, inspection criteria, and repair requirements depend on the specific system, installation, and applicable local regulations. Follow the approved design and site procedures, and consult qualified professionals whenever damage, uncertainty, or a proposed change could affect safety.
Record clear height, columns, doors, sprinkler lines, and uneven floor areas. Measure the largest loaded pallet, including any overhang. Small details matter.
Test the loaded forklift’s turning path, not just its advertised width. Include pallet depth and careful placement space. A tape layout helps.
Mark rack rows and turning paths with tape. Test intersections and sightlines around end frames. Paper plans can feel surprisingly spacious.
Note each load’s width, height, weight, and overhang. A common pallet size may not match the cartons sitting on it. Check the real load.
Include the pallet, packaging, and uneven weight distribution. Verify beam and bay capacities with a qualified rack designer. Keep the figures visible.
Check floor condition, slab capacity, low pipes, doorways, and sprinkler clearance. Recheck measurements on site. A few centimeters can matter.
Post load limits where operators can see them. Train staff to report bent uprights, loose anchors, and damaged beams promptly. Some damage hides behind pallets.
Allow room for pedestrians, staging, maintenance, and guards. These spaces often disappear in drawings. I still find them easy to underestimate.
Consider whether stock or handling equipment may change. Selective racks provide direct access to each pallet position, but turning space still needs testing. Reconsider the plan after a floor trial.
Choosing Selective Pallet Racking begins with a clear understanding of your inventory, pallet dimensions, product turnover, and storage goals. Evaluate how often goods must be accessed and determine whether direct access to every pallet is essential. Next, measure the warehouse carefully, including ceiling height, aisle width, column locations, doors, lighting, sprinklers, and material-handling clearances. These details help establish suitable rack dimensions and an efficient pallet access configuration without restricting equipment movement or emergency access.
Before installation, confirm that the rack system can safely support the combined pallet loads and operating conditions, including floor strength, seismic considerations, and environmental factors. The design should follow applicable safety requirements and include appropriate protection for busy work areas. Finally, prepare a professional installation plan, verify that the completed system is stable and correctly assembled, and establish regular inspections and maintenance. Promptly address damaged components, loose connections, or changes in load patterns to preserve safety, efficiency, and long-term warehouse performance.